November 3, 2013

The Oaks at Winfrey Farm.

The way we really got hooked on chickens was visiting an open house in our neighborhood. There we met Mark and Dennis. They opened the door on the experience of having chickens.  On our page tabs check out Pecking Order for photos and information from their days as urban backyard chicken keepers!
 

Now a few years later we went to another open house at their new home out in the country. They have a really cool 100 year plus county house and farm. I will let the photos tell the story.


Harry

August 28, 2013

New Chick In The Coop

One of the reasons we started this blog was to document and share our experiences in raising our flock of backyard chickens - with high hopes of helping others. Well, introducing a new chicken into our established flock has been a MAJOR learning experience.

What we thought would happen and what really happened...

Our local community chicken FaceBook page had a post from one of our neighbors stating they needed to re-home their chicken. They were down to one chicken and, because they had a new baby themselves, they wanted to find a good home for her rather than add to the flock at that time. After much conversation Liz and I decided to go visit her. She was gorgeous and I was really surprised at her size! Her name is Claudine, a very friendly, 2 year old buff Orpington.

Meet Claudine!
It was a Saturday afternoon, so we decided to take her back down to meet the our flock and have a short play-date. We set up a play area for Claudine (a small wire fenced area) and placed her and the box we carried her down in in the middle. We let our girls out and they ran over to welcome her. Their welcome was in the form of a stare-down and the old evil eye. After a relatively short time the welcoming committee ran off to do their thing - leaving Claudine looking terrified!

Who's that?

Well, we thought THIS will be easy!  Our only concern was Tallulah, a Welsummer, who is the self-appointed leader of the flock. The other girls were so sweet how could they NOT love Claudine!

Julie giving Claudine the once-over!

We removed the fence and let Claudine roam around in the yard on her own. Again, a few of our chicks came over and checked her out and then went about their business. Then CARMEN, our Polish Crested, who is the smallest and maybe the lowest ranked in our flock came over to greet her.

Being blonds, we thought they'd have a lot in common and could be best buddies...right! At that point Carmen became a different bird. She was like a transformer changing into battle position with fluffed feathers and extended her height almost doubling her size. Claudine basically said oh crap and froze in a bowing (submitting) pose  - like she was trying hide her head or whole self!

Back off chick!

Carmen (who had obviously gone to the dark side) positioned her head and beak over Claudine’s neck and dared her to move. They held this position for a minute or two. When Carmen jumped ON her and it was time the humans to break it up.  Of course all the other girls ran over to see the what excitement was and it was then that everyone knew Claudine was not aggressive and would be easy to take advantage of.

Where's that 'cloak of invisibility' when you need it?!

Claudine was relieved to go back to her own yard that afternoon. That night we would consider whether we would try it again. We researched blogs and websites to learn how to introduce a new chick onto the flock. However, most said it was not an easy task and introducing one was even more a challenge. I couldn't help but think this chicken is twice as big as ours and she will stand up for herself and find her place!

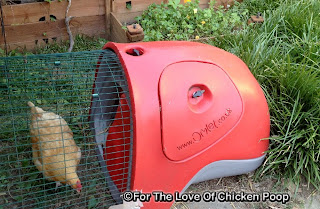
 My big concerned was whether or not she would go up and roost with the our chicks that night and she needed a place to stay. Claudine’s coop was an EggLoo, a plastic molded coop from England that sits on the ground with a small wired run. Since she was use to sitting closer to the ground I decided to make her a small alternative roost/nesting box to put in the run. I took an old wooden drawer I saved from a butler’s pantry and attached some plywood panels on the sides and back. Inside the drawer I installed a 2 x 2 perch. She should love this!

For me?
I placed this portable nesting/roosting box in the open area under the coop in the run. Certain she would love it and use it.

Coop furniture in run under coop
After finishing my coop/run furniture we brought Claudine down for a second try. We let her out into the backyard and it was like the movie Christmas Story with the bullies chasing her down the alley!

These chicks are crazy!

Later we tried putting her in the run with the others and she had to escape to the highest perch in the run to keep everybody from picking on her.

Home sweet home!

The biggest chicken (in size)  and well, a big chicken, we decided it would take time, and us working with them, for everyone to get use to each other. Claudine's original owner let us have her coop (portable, thank goodness) and we brought it down to let her stay in it for a few days until everyone became friends - so we thought.


A couple of weeks went by and it looked as if most of our girls were getting use to her. She would wander around the yard, a bit further from her coop, everyday.  However, there were constant setbacks, as Carmen continued to challenge her and then everyone else would join in. Claudine would head for the highest spot she could find, usually the top of her run!


Well, I'm in the coop, Now What?

By week 4 it was time to try an overnight stay in the main run (we still had a micro speck of hope...)! At dusk, we took Carmen out of our run and put Claudine in it with the others they - barely notice her. Carmen spent the night in Claudine’s coop - NOT a happy camper over her time-out!  Claudine did not use the box I built but actually went up into the coop and roosted on a log in the coop. The next morning she came out in the run but escaped to the top perch and refused to mingle with anyone else. We took Carmen out of time-out and put her back into the run and the drama started all over. We thought the separation or time-out would knock Carmen back down in the pecking order and it did, for a few hours.

Don't turn your back on me!

We finally came to the conclusion that this was not going to work. We needed to re-home her for her own safety. Within a day or two we found another home for Claudine a few blocks over and she integrated into the flock with no problems -even going up to roost all on her own without being terrified someone wanting to take her out!  The big difference was that they had multiple generations of chickens, from young to old, and they also had a Roo to keep order. We visited Claudine recently and she looked great! Her new chick mom, Leanne, said she had already worked her way up a couple of notches in the flock order! So she's evidently doing quite well in her new home.

Lessons learned: Listen to what other experience folks tell you about introducing new members into the flock. Also, we have a one-generation flock that has been together always with no other chicks and we do not have a Roo to keep order.

Please read more, from Liz, about our adventures with Claudine at Community Chickens! http://communitychickens.blogspot.com/2013/08/adventures-with-claudine-trying-to-add.html


.........Harry


July 19, 2013

All About Coconut Milk

COCONUT MILK

Coconut milk is the liquid that comes from the grated meat of a coconut. The color and rich taste of the milk can be attributed to the high oil content. Most of the fat is saturated fat. Coconut milk is a very popular food ingredient used in Southeast Asia. It is packed with B- vitamins and minerals. It comes in full-fat (regular), lite and organic blends.  I have tried many brands and so far I like Thai Kitchen best for my own uses (I am not being  paid or reimbursed for promoting Thai Kitchen brand coconut milk)!


Regular or Full-fat
 Full-Fat Canned Coconut Milk:
Decades ago, this was a hard-to-find specialty Asian ingredient.  Now almost every grocery store carries it.  Look for it in the ethnic section of your local grocery store, or online. Good brands will have a thick cream that separates and rises to the top. The more separation and thicker cream, the better the product.


Lite
Lite Canned Coconut Milk:
Lite coconut milk is simply full-fat with water added to it. You can save money when you want lite coconut milk by making your own. Just use one part full-fat canned coconut milk with two parts water. Lite coconut milk may be used in recipes as a substitute for half and half, but lite coconut milk isn’t quite as rich. 
Note:  Lite coconut milk will not separate to give you fluffier coconut cream that you get using full-fat.


Coconut Milk Beverage:
Do not confuse this low-fat milk-like drink with canned coconut milk.  Coconut milk beverages are made from coconut water.This is the clear liquid inside coconuts (fruits of the coconut palm). This is a milk alternative, and should be used as such for drinking or in recipes. It is sold in cartons in the refrigerated section or with other shelf-stable milk alternatives. If you are frugal, you can make your own by simply adding water to full-fat coconut milk. Coconut milk beverage can be used as a substitute for low fat or whole milk in a 1:1 ratio.


So what can you do with canned coconut milk?

This creamy goodness is perfect for everything from dinners to desserts. You can whip it into a non-dairy mousse, or create meat and fish marinades recipes. Coconut milk is so versatile!

You can empty a can of full-fat into a larger jar (like a mason jar) and put it in the fridge to chill. Use a fork to lightly whip or blend into a fluffy consistency. Although the 'fluff' won't last long but it works well as a topping or sauce for desserts - again dairy free and artificial ingredient free.

I use coconut milk (full-fat) in my coffee all the time. It's wonderful. I've made french toast (substituting lite coconut milk for regular milk) and no one knew the difference.  I know it's very high in fat but it has NO artificial ingredients, dairy-free.


A Few Of The MANY USES for Coconut Milk:

Salad Dressings -

 lo-cal (MY creation)
1/3 C. Lite coconut milk
1/4 Tsp. Dried Italian seasoning mix
1/4 Tsp. Dried garlic
Salt and pepper to taste.

This makes enough for one salad and it's 50 calories using the lite coconut milk.
It's easy and you can experiment with your favorite seasonings! I'm going to make poppy seed dressing using lite coconut milk for a fruit salad.
Coconut milk has such a light fresh flavor and aroma and it lends itself nicely to many other flavors so experiment away!

There are so many recipes coconut-milk-based salad dressings available to choose from!


Braising -
Coconut milk may not be the first ingredient you associate with meat, but it actually adds a sweet, delicious touch to the meal. Mix about ½ cup of coconut milk into the liquid of braising meat or chicken.  The milk absorbs the flavors of the dish and makes a creamy, full-flavored sauce.

Smoothies, Dairy Free -
In smoothie recipes you can replace the dairy called for with coconut milk!  Coconut blends well with most all whole fruit and veggies. Recipes and ideas for dairy-free smoothies is endless!


Yummy Ice cream!


There are many super-easy recipes available online for using coconut milk to make ice cream!

Cereal -
Use a combination of coconut milk and dairy or soy milk to enliven your everyday breakfast cereal. Try a ratio of roughly 2 parts dairy or soy milk to 1 part light coconut milk for a hint of sweetness and a surprisingly nice hint of nutty essence.


Lite Coconut milk can be substituted on a 1 cup to 1 cup basis with regular milk, soy milk, almond milk or rice milk.

Full-fat coconut milk can also be substituted on a 1 cup to 1 cup basis with whipped cream. When done in this fashion, also add about ½ tsp of vanilla extract for every cup substituted in this manner - sweeten to taste with any sweetener.


- Be sure and check out out post about coconut oil and coconut butter at Community Chickens -  http://communitychickens.blogspot.com/2013/07/about-coconut-oil-and-diy-for-coconut.html


 -and keep those chickens cool...

Liz ~

May 23, 2013

Raising a Garden Bed

We have a few raised beds we built several years ago for our vegetables. The chicks were very young last year and didn't really get out to roam around much. However this Spring they discovered our spinach coming back and that was the end of that. So my goal over the last few weeks was to design and build a raised bed with the ability to block access of our girls, make it economical and easy to put together.

Carmen inspecting the new lumber.
The Design - Four corner posts (typical 4x4 fence posts) with two slots on adjacent sides to allow panels to slide in and out. I used fence siding to frame the panels. The fence posts were eight feet long and the fence boards were six feet. The length of the bed is the full length of the fencing boards, six feet. The width is three feet, allowing the the fencing boards to simply be cut in half.

REMEMBER - ALWAYS USE SAFETY PRECAUTIONS WHEN WORKING WITH POWER TOOLS!

The Work  - I cut the fence posts in half giving me four four-foot lengths. Later I realized this was way too long and cut a foot off of each post.  I think 32" length would be OK allowing three to be cut out of one eight foot post. I put them in the ground approximately one foot deep.


To create the slots I ripped each fence board 3 times to get four pieces approximately 1 7/16" wide. Cut the strips the length of the pole minus one foot. The fence boards are approximately 5/8" thick so I use a 3/4" board as a spacer to place my strips on. This allows tolerance for any warped boards. I pre-drilled holes for nails to prevent the wood from splitting.


I used galvanized common nails to attach the strips.


For the panel frames  I ripped the boards twice to get three strips approximately 1 5/8" wide. Lengths are the same as my side panels. The vertical strips are cut at 23".


I nailed the panel frames together with galvanized fasteners, two on one side of the joint and one on the other side. These frames are later covered with chicken wire from two foot wide rolls. They are attached with staples.


Placement of the bed - I use a post hole digger to dig the holes for the post. I used my side boards to rough in the spacing. The holes are dug one foot deep. I placed all four poles in to check the position.

NOT an upside down table!

At this time I released my posts were too tall...Liz said it looked like an upside down table!- Back to the shop to cut a foot off of each corner post!

Plenty of help on hand.
I firmed up and leveled the first corner by extending boards and stakes in two directions. With the post held into position, the hole is filled and packed. I used the fence frames to help square up the other posts, then repeated packing.

Almost there.
In this case I dug up the grass in the area were the bed is however you can also use a ground cloth.

*Layers of newspaper make great ground cover, are free and last up to 18 months before disintegrating. Great for use in small flower/vegetable garden areas to keep weeds out.


 Fill with dirt and plant!  Then just slide in your siding to restrict the chickens (and dogs in our case)! Just slide out when you need to work in the bed.


The girls could probably fly over, if they wanted in bad enough, but so far they've had no interest. Maybe the main reason is that they are now too fat from worms to fly that high.

More detailed plans to come.

Happy gardening!

Harry~